
Microsoft is currently working on a new authentication and authorization model that is simply referred to as “v2” in the docs that they have available right now (UPDATE: they prefer the “v2 auth endpoint”). I decided to spend some time taking a look around this model and in the process have been writing up some tips and other useful information and code samples to help you out as you start making your way through it. Just like I did with other reviews of the new Azure B2B and B2C features, I’m not going to try and explain to you exactly what they are because Microsoft already has a team of humans doing that for you. Instead I’ll work on highlighting other things you might want to know when you actually go about implementing this.
One other point worth noting – this stuff is still pre-release and will change, so I’m going to “version” my blog post here and I will update as I can. Here we go.
Version History
1.0 – Feb. 3, 2016
What it Does and Doesn’t Do
One of the things you should know first and foremost before you jump in is exactly what it does today, and more importantly, what it does not. I’ll boil it down for you like this – it does basic Office 365: email, calendar and contacts. That’s pretty much it today; you can’t even query Azure AD as it stands today. So if you’re building an Office app, you’re good to go.
In addition to giving you access to these Microsoft services, you can secure your own site using this new model. One of the other terms you will see used to describe the model (besides “v2”) is the “converged model”. It’s called the converged model really for two reasons:
- You no longer need to distinguish between “Work and School Accounts” (i.e. fred@contoso.com) and “Microsoft Accounts” (i.e. fred@hotmail.com). This is probably the biggest achievement in the new model. Either type of account can authenticate and access your applications.
- You have a single URL starting point to use for accessing Microsoft cloud services like email, calendar and contacts. That’s nice, but not exactly enough to make you run out and change your code up.
Support for different account types may be enough to get you looking at this. You will find a great article on how to configure your web application using the new model here: https://azure.microsoft.com/en-us/documentation/articles/active-directory-v2-devquickstarts-dotnet-web/. There is a corresponding article on securing Web API here: https://azure.microsoft.com/en-us/documentation/articles/active-directory-devquickstarts-webapi-dotnet/.
Once you have that set up, you can see here what it looks like to have both types of accounts available for sign in:

The accounts with the faux blue badges are “Work or School Accounts” and the Microsoft logo account is the “Microsoft Account”. Equally interesting is the fact that you can remain signed in with multiple accounts at the same time. Yes! Bravo, Microsoft – well done. 🙂
Tips
Knowing now what it does and doesn’t do, it’s a good time to talk about some tips that will come in handy as you start building applications with it. A lot of what I have below is based on the fact that I found different sites and pages with different information as I was working through building my app. Some pages are in direct contradiction with each other, some are typos, and some are just already out of date. This is why I added the “version” info to my post, so you’ll have an idea about whether / when this post has been obsoleted.
Tip #1 – Use the Correct Permission Scope Prefix
You will see information about using permission scopes, which is something new to the v2 auth endpoint. In short, instead of defining the permissions your application requires in the application definition itself as you do with the current model, you tell Azure what permissions you require when you go through the process of acquiring an access token. A permission scope looks something like this: https://outlook.office.com/Mail.Read. This is the essence of the first tip – make sure you are using the correct prefix for your permission scope. In this case the permission prefix is “https://outlook.office.com/” and is used to connect to the Outlook API resource endpoint. Alternatively your app can also call the Microsoft Graph endpoint under https://graph.microsoft.com, in which case you should use the prefix https://graph.microsoft.com/ for your permission scope. The net of this tip is fairly simple – make sure you are using the same host name for your permission scopes as you do for your API endpoints. So if you want to read email messages using the API endpoint of https://outlook.office.com/api/v2.0/me/messages, make sure you use a permission scope of https://outlook.office.com/Mail.Read. If you mix and match – use a permission scope with a prefix of https://graph.microsoft.com but try to access an API at https://outlook.office.com… – you will get an access token; however when you try and use it you will get a 401 unauthorized response.
Also…I found in one or more places where it used a prefix of “http://outlook.office.com/”; note that it is missing the “s” after “http”. This is another example of a typo, so just double check if you are copying and pasting code from somewhere.
Tip #2 – Not All Permission Scopes Require a Prefix
After all the talk in the previous tip about scope prefixes, it’s important to note that not all permission scopes require a prefix. There are a handful that work today without a prefix: “openid”, “email”, “profile”, and “offline_access”. To learn what each of these permission scopes grants you can see this page: https://azure.microsoft.com/en-us/documentation/articles/active-directory-v2-compare/#scopes-not-resources. One of the more annoying things in reviewing the documentation is that I didn’t see a simple example that demonstrated exactly what these scopes should look like. So…here’s an example of the scopes and how they’re used to request a code, which you can use to get an access token (and refresh token if you include the “offline_access” permission – see, I snuck that explanation in there). Note that they are “delimited” with a space between each one:
string mailScopePrefix = “https://outlook.office.com/”;
string scopes =
“openid email profile offline_access ” +
mailScopePrefix + “Mail.Read ” + mailScopePrefix + “Contacts.Read ” +
mailScopePrefix + “Calendars.Read “;
string authorizationRequest = String.Format( “https://login.microsoftonline.com/common/oauth2/v2.0/authorize?response_type=code+id_token&client_id={0}&scope={1}&redirect_uri={2}&state={3}&response_mode=form_post&nonce={4}”,
Uri.EscapeDataString(APP_CLIENT_ID),
Uri.EscapeDataString(scopes),
Uri.EscapeDataString(redirUri),
Uri.EscapeDataString(“Index;” + scopes + “;” + redirUri),
Uri.EscapeDataString(Guid.NewGuid().ToString()));
//return a redirect response
return new RedirectResult(authorizationRequest);
Also worth noting is that the response_type in the example above is “code+id_token”; if you don’t include the “openid” permission then Azure will return an error when it redirects back to your application after authentication.
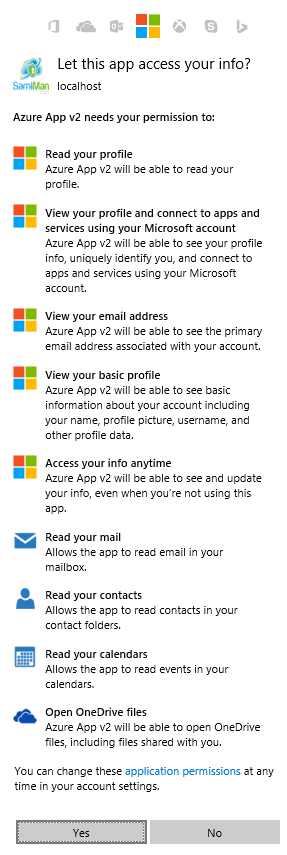
When you log in you see the standard sort of Azure consent screen that models the permission scopes you asked for:

Again, worth noting, the consent screen actually will look different based on what kind of account you’ve authenticated with. The image above is from a “Work or School Account”. Here’s what it looks like when you use a “Microsoft Account” (NOTE: it includes a few more permission scopes than the image above):
For completeness, since I’m sure most folks today use ADAL to get an access token from a code, here’s an example of how you can take the code that was returned and do a POST yourself to get back a JWT token that includes the access token:
public ActionResult ProcessCode(string code, string error, string error_description, string resource, string state)
{
string viewName = “Index”;
if (!string.IsNullOrEmpty(code))
{
string[] stateVals = state.Split(“;”.ToCharArray(),
StringSplitOptions.RemoveEmptyEntries);
viewName = stateVals[0];
string scopes = stateVals[1];
string redirUri = stateVals[2];
//create the collection of values to send to the POST
List<KeyValuePair<string, string>> vals =
new List<KeyValuePair<string, string>>();
vals.Add(new KeyValuePair<string, string>(“grant_type”, “authorization_code”));
vals.Add(new KeyValuePair<string, string>(“code”, code));
vals.Add(new KeyValuePair<string, string>(“client_id”, APP_CLIENT_ID));
vals.Add(new KeyValuePair<string, string>(“client_secret”, APP_CLIENT_SECRET));
vals.Add(new KeyValuePair<string, string>(“scope”, scopes));
vals.Add(new KeyValuePair<string, string>(“redirect_uri”, redirUri));
string loginUrl = “https://login.microsoftonline.com/common/oauth2/v2.0/token”;
//make the request
HttpClient hc = new HttpClient();
//form encode the data we’re going to POST
HttpContent content = new FormUrlEncodedContent(vals)
//plug in the post body
HttpResponseMessage hrm = hc.PostAsync(loginUrl, content).Result;
if (hrm.IsSuccessStatusCode)
{
//get the raw token
string rawToken = hrm.Content.ReadAsStringAsync().Result;
//deserialize it into this custom class I created
//for working with the token contents
AzureJsonToken ajt =
JsonConvert.DeserializeObject<AzureJsonToken>(rawToken);
}
else
{
//some error handling here
}
}
else
{
//some error handling here
}
return View(viewName);
}
One note – I’ll explain more about the custom AzureJsonToken class below. To reiterate Tips #1 and 3, since my permission scope is based on the host name outlook.office.com, I can only use the access token from this code with the Outlook API endpoint, such as https://outlook.office.com/api/v1.0/me/messages or https://outlook.office.com/api/v2.0/me/messages. Yes, that is not a typo, you should be able to use the access token against either version of the API.
Tip #3 – Use the Correct Service Endpoint
Similar to the first tip, I saw examples of articles that talked about using the v2 auth endpoint but used a Graph API permission scope with a Outlook API endpoint. So again, to be clear, make sure your host names are consistent between the permission scopes and API endpoints, as explained in Tip #1.
Tip #4 – Be Aware that Microsoft Has Pulled Out Basic User Info from Claims
One of the changes that Microsoft made in v2 of the auth endpoint is that they have arbitrarily decided to pull out most meaningful information about the user from the token that is returned to you. They describe this here – https://azure.microsoft.com/en-us/documentation/articles/active-directory-v2-compare/:
In the original Azure Active Directory service, the most basic OpenID Connect sign-in flow would provide a wealth of information about the user in the resulting id_token. The claims in an id_token can include the user’s name, preferred username, email address, object ID, and more.
We are now restricting the information that the openid scope affords your app access to. The openid scope will only allow your app to sign the user in, and receive an app-specific identifier for the user. If you want to obtain personally identifiable information (PII) about the user in your app, your app will need to request additional permissions from the user.
This is sadly classic Microsoft behavior – we know what’s good for you better then you know what’s good for you – and this horse has already left the barn; you can get this info today using the v1 auth endpoint. Never one to be deterred by logic however, they are pressing forward with this plan. That means more work on you, the developer. What you’ll want to do in order to get basic user info is a couple of things:
- Include the “email” and “profile” scopes when you are obtaining your code / token.
- Ask for both a code and id_token when you redirect to Azure asking for a code (as shown in the C# example above).
- Extract out the id_token results into a useable set of claims after you exchange your code for a token.
On the last point, the Microsoft documents say that they provide a library for doing this, but did not include any further detail about what it is or how you use it, so that was only marginally helpful. But hey, this is a tip, so here’s a little more. Here’s how you can extract out the contents of the id_token:
- Add the Security.IdentityModel.Tokens.Jwt NuGet package to your application.
- Create a new JwtSecurityToken instance from the id_token. Here’s a sample from my code:
JwtSecurityToken token = new JwtSecurityToken(ajt.IdToken);
- Use the Payload property of the token to find the individual user attributes that were included. Here’s a quick look at the most useful ones:
token.Payload[“name”] //display name
token.Payload[“oid”] //object ID
token.Payload[“preferred_username”] //upn usually
token.Payload[“tid”] //tenant ID
As noted above though in my description of the converged model, remember that not every account type will have every value. You need to account for circumstances when the Payload contents are different based on the type of account.
Tip #5 – Feel Free to Use the Classes I Created for Deserialization
I created some classes for deserializing the JSON returned from various service calls into objects that can be used for referring to things like the access token, refresh token, id_token, messages, events, contacts, etc. Feel free to take the examples attached to this posting and use them as needed.
Microsoft is updating its helper libraries to use Office 365 objects with v2 of the app model so you can use them as well; there is also a pre-release version of ADAL that you can use to work with access tokens, etc. For those of you rolling your own however (or who aren’t ready to fully jump onto the pre-release bandwagon) here are some code snippets from how I used them:
//to get the access token, refresh token, and id_token
AzureJsonToken ajt =
JsonConvert.DeserializeObject<AzureJsonToken>(rawToken);
This next set is from some REST endpoints I created to test everything out:
//to get emails
Emails theMail = JsonConvert.DeserializeObject<Emails>(data);
//to get events
Events theEvent = JsonConvert.DeserializeObject<Events>(data);
//to get contacts
Contacts theContact = JsonConvert.DeserializeObject<Contacts>(data);
You end up with a nice little dataset on the client this way. Here’s an example of the basic email details that comes down to my client side script:

Finally, here’s it all pulled together, in a UI that only a Steve could love – using the v2 app model, some custom REST endpoints and a combination of jQuery and Angular to show the results (yes, I really did combine jQuery and Angular, which I know Angular people hate):
Emails

Events

Contacts

Summary
The new auth endpoint is out and available for testing now, but it’s not production ready. There’s actually a good amount of documentation out there – hats off to dstrockis at Microsoft, the writer who’s been pushing all the very good content out. There’s also a lot of mixed and conflicting documents though so try and follow some of the tips included here. The attachment to this posting includes sample classes and code so you can give it a spin yourself, but make sure you start out by at least reading about how to set up your new v2 applications here: https://azure.microsoft.com/en-us/documentation/articles/active-directory-v2-app-registration/. You can also see all the Getting Started tutorials here: https://azure.microsoft.com/en-us/documentation/articles/active-directory-appmodel-v2-overview/#getting-started. Finally, one last article that I recommend reading (short but useful): https://msdn.microsoft.com/en-us/office/office365/howto/authenticate-Office-365-APIs-using-v2.
You can download the attachment here:

[…] The New Azure Converged Auth Model and Office 365 APIs […]
LikeLike
[…] The New Azure Converged Auth Model and Office 365 APIs by Steve Peschka […]
LikeLike
[…] The New Azure Converged Auth Model and Office 365 APIs by Steve Peschka […]
LikeLike
[…] The New Azure Converged Auth Model and Office 365 APIs by Steve Peschka […]
LikeLike
[…] The New Azure Converged Auth Model and Office 365 APIsThe New Azure Converged Auth Model and #Office365dev APIs by Steve Peschka.Office Dev PnP Web Cast – Introduction to Microsoft Graph for Office 365 developer In this PnP Web Cast we concentrate on the Microsoft Graph and more specifically on how you can use that without in your solutions to access user or company specific information when you are developing solutions for Office 365. In the presentation part we concentrate on covering what's in the Microsoft Graph and how you can use that in general. […]
LikeLike
[…] The New Azure Converged Auth Model and Office 365 APIs by Steve Peschka […]
LikeLike
[…] The New Azure Converged Auth Model and Office 365 APIs by Steve Peschka […]
LikeLike
[…] The New Azure Converged Auth Model and Office 365 APIs by Steve Peschka […]
LikeLike
[…] The New Azure Converged Auth Model and Office 365 APIs by Steve Peschka […]
LikeLike
[…] The New Azure Converged Auth Model and Office 365 APIs by Steve Peschka […]
LikeLike